Whirlpool Cost Reductions II: Rear Bearings
Note: if you’re here because your mixer is making an awful noise when running, you can skip to the end for a solution.
Continuing the examination of areas in which Whirlpool has cut costs brings us to the rear bearing bracket assembly.
The rear bearing bracket is a cleverly designed multi-functional part:
- It carries a spherical bearing which provides support for the rear end of the motor shaft;
- It functions as a heat sink for the phase control board (in solid-state speed control models) or for the power resistor (in pre-solid-state models);
- It provides a mounting point for the speed control plate, which is a crucial part of the speed control system.
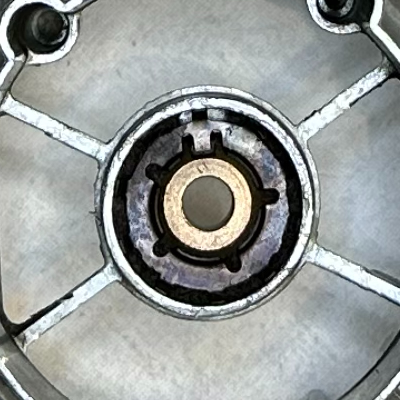
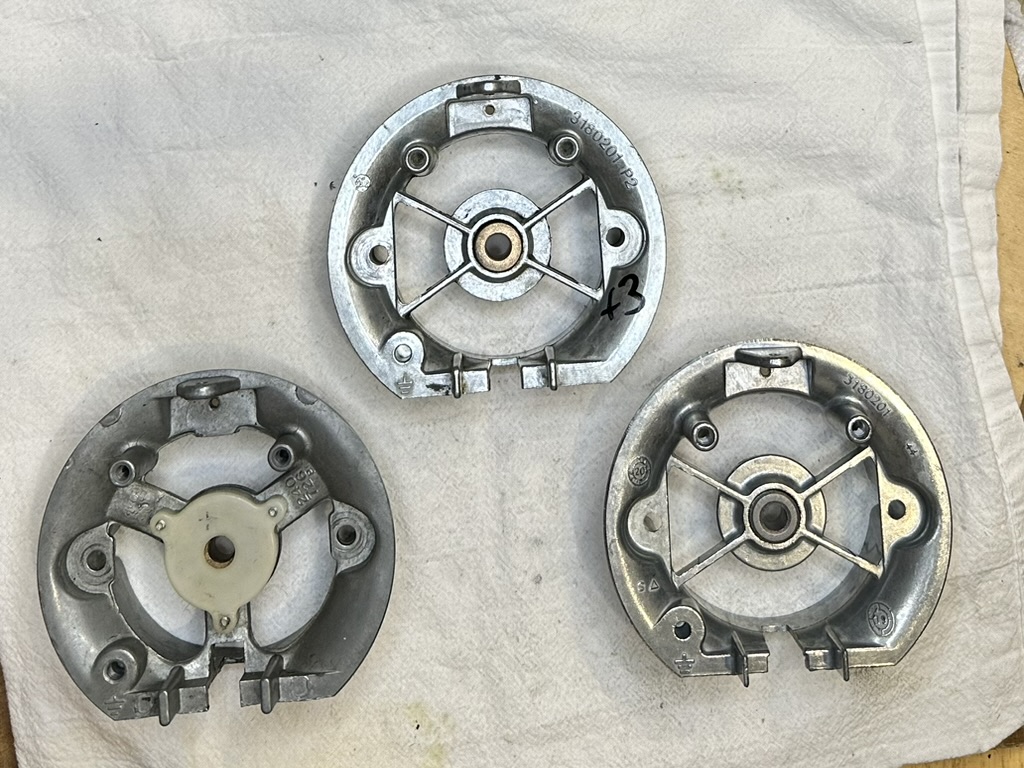
Pictured here are three generations of rear bearing assembly, with the oldest on the left, and the newest on the right. First is the inside of the bracket. (This is not ordinarily visible, since it faces into the cavity of the motor housing.)

In the center is the rear motor bearing. This spherical bearing is held in place by a spring retainer. In the original Hobart production (left), the retainer was a copper spring, secured in place with three 4-40 thread screws.
Beginning some time in the 1990s, Whirlpool moved to a press-in spring retainer (center and right). The retainer is a steel spring, with little “fingers” that dig into the sides of the bearing well. This is faster (and thus cheaper) to assemble, but unfortunately it means that the bearing is not easily removable for replacement or refurbishing. Removing the retainer damages the fingers, and the retainer part is not available separately. That’s unfortunate, because the bearing is a wear part. It’s wasteful to discard the entire assembly simply in order to replace the bearing.
The material of the bearing itself has changed over time. The older Hobart and early Whirlpool bearings are made of porous bronze (Oilite®), which has a distinctive copper/bronze color. The later (and current production) bearings are made of iron bronze. This reduces costs as well. There’s no appreciable difference in performance here.
Also visible in these photos are changes to the bracket casting itself: the Hobart casting is thicker and stronger, and uses three heavy ribs to support the bearing. Later Whirlpool castings are successively thinner, and use four lighter ribs. The heavier casting functions more effectively as a heat sink, which allows the phase board to run cooler and allows less heat to reach the outside of the housing. The difference here is more theoretical than practical, though.
The lighter castings are more prone to deformation during installation; the unwary DIY installer or rushed assembly-line worker is at risk of bending the bracket by overtightening the nuts that secure the bracket onto the stator screws.
Finally, Whirlpool has deleted the lubrication mechanism of the rear bearing. The older bearings (left and center) were kept lubricated by a felt washer. When saturated with oil during assembly, the felt washer provides a steady source of lubrication to the bronze bearing. In the original Hobart assembly the felt washer is accessible by removing the three screws securing the bearing retainer and then lifting off the bearing cap (see photo below). In the mid-series Whirlpool assembly (center) the felt is accessible from the inside of the bearing, and may be relubricated as needed.
However, in the current generation of the assembly (right), Whirlpool has deleted the felt washer entirely. This completely eliminates ongoing lubrication of the bearing, and significantly shortens its service life. Mixers which use this bearing will occasionally present with a loud squealing noise coming from the back of the mixer. This occurs because the lubricant in the bearing has dried out, allowing metal-to-metal contact between the motor shaft and the bearing itself.
This view shows the outside of the respective bearing bracket generations. The bearing cover (which holds the oil felt) is visible in the original Hobart design (left).
How to Quiet a Noisy Rear Bearing
If your rear bearing is making a loud squealing noise, it can be temporarily refreshed with two small drops of sewing machine oil, applied at the point where the motor shaft enters the bearing. (Only use sewing machine oil — Singer or Lily White. Do not use 3-in-1, WD-40, or anything but sewing machine oil. And use a dropper, not a sprayer, or else oil will end up in places where it will cause trouble.)
To apply the oil:
- Unplug the mixer.
- Remove the rear cover: first remove the small screw at the top, then tilt the cover back slightly, and lift it up slightly to disengage the hooks.
- Turn the speed control to “10”. This will move the speed control plate back and give you better access for reaching the motor shaft where it enters the bearing.
- Raise the rear of the mixer so that it’s tilted slightly forward. This will help the oil run into the bearing.
- Apply one drop of oil to the shaft at the point where it enters the metallic rear bearing. Then, use your finger on the motor governor to turn the shaft 180° (half a turn).
- Apply another drop of oil to the shaft at the same point as in the previous step. Then, turn the shaft half a turn.
- Move the speed control to “off”.
- Reinstall the rear cover.